Wednesday, October 28, 2009
Red Lentil Chipotle Mango Soup
1 cup red lentils
4 cups water
1 onion chopped
5 garlic cloves minced
2 large ribs celery chopped
2 large carrots chopped
1 teas cumin
1 teaspoon coriander
2 Tablespoons fresh ginger minced
1 1/2 cups frozen spinach
3 Tablespoons roasted chipotle mango sauce
2 squirts Chipotle Tabasco Sauce
In a large pan add picked-clean rinsed and drained red lentils and four cups of water. Bring to a boil and cover with lid tilted a little. Simmer over low heat until soft, about ten minutes.
Cut and chop the onion, garlic, celery and carrots. With the celery I cut three long slices lengthwise and then cut into bite size pieces. I cut the carrots lengthwise also and if they are on the larger size I cut again so you have four separate lengths. And then chop them as you normally would into bite size pieces.
I water saute the veggies for about five minutes. I like crunch in my soups so I cook my vegetables crisp-tender . I taste as I'm sauteing so I make sure it's the right texture for me. You may like yours cooked completely and if so keep cooking for another five minutes or until it cooks to the degree of doneness that you like.
TIP: If you leave the vegetables crisp tender, I think you'll find the flavor of the onion, garlic, carrot and celery is more intense.
When the lentils are finished cooking, you can blend them in your blender or use an immersion blender. I leave mine as is without blending.
Add your sauteed veggies to the lentils and add the cumin, coriander, ginger and the spinach. You can use fresh if you'd rather. I always have frozen on hand and it's quick and easy. Stir to combine all the ingredients.
At the end I added the roasted chipotle mango sauce. You can order the mango sauce online http://www.lwcbrandsinc.com/fth15ozboofr.html or just add a small amount of pureed mango. (If you decide to purchase the sauce online, the raspberry is really tasty too.) The mango gives the soup a really nice, mild sweetness. If you're one that doesn't like any sweetness at all to your savory dishes don't add it because you probably won't like it.
And finally add a couple of squirts of the chipotle tabasco sauce or to taste. And if you substitute pureed mango for the mango sauce, add an extra squirt or two tasting as you add.
I hope you'll try this soup and let me know how you like it. Cook and eat to live everyone!
Laina :-)
Tuesday, October 27, 2009
Last of my eggplant
I'm so sad. I just picked what may be the last of my eggplant for the year. We have a cold front coming in and it's suppose to get down to freezing for two nights in a row. There are some flowers still on the plant but they'll fall off when the temperature drops.
My bell peppers have already stopped producing. Well they've been blooming and there is a bell pepper, but it's the size of my pinky nail so I pulled them up, root and all.
I didn't get a whole lot of the aubergine, but I'm grateful they did okay and that I was able to enjoy one of my favorite vegetables. I have heard from others that some of their garden didn't do so well this year, and was sad for them because I know how much that hurts when you spend lots of money, time, and effort with the results being no crop, or a ruined crop.
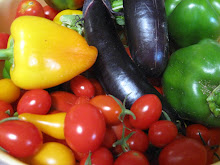
I also picked probably the last of the zucchini too. You'll see them in the photo along with the tomatoes. I'm going to try to save the tomato and zucchini plants by covering them with blankets at night and then uncover them during the day.
Susan at fatfree vegan calls this Fuhrman weather. I chuckled because Eat To Live is all about greens and this is the best time of year for them - spinach, lettuce, kale, collards, cauliflower, broccoli, cabbage . . . etc. Also many of these are cruciferous veggies which are stars of this diet, especially for those who have autoimmune diseases.
Tip:
I picked whatever grape tomatoes were left in the garden. Many are orange, not nice and red, but here's a tip. Many think you should put a slightly green tomatoes, or not quite ripe tomatoes on the window sill to complete the ripening process.
I use to think this too, but I came across a tip (don't remember where) and tried it to see if it would work. And it did. The author of this tip also said that all I was doing was frying my tomatoes when they sit in the sun like that.
So next time you've got an unripe tomato, wrap it in a towel on your counter. It will ripen within a day or two if it's close to already ripe. I'm going to try it with the grape tomatoes in the picture above and see if I can get them to redden up a little more.
Also, it's not a good idea to refrigerate tomatoes. It makes them mealy and removes flavor somehow. So purchase your tomatoes when you'll use them or use within 3 days of purchase. Also when your tomatoes are sitting on the counter, turn them over stem side down. It helps them to last longer.
Eat to live everyone!
Laina :-)
Monday, October 26, 2009
I am still so thrilled with my homemade soy yogurt. I ate some with lunch today as a dessert.
I measured 1/2 cups of frozen blueberries and microwaved them just enough so that they weren't frozen hard anymore, but still frozen. Sort of like a softer frozen only not soft. Is that confusing? :-)
On top of that I added probably three forth's cup of my homemade yogurt, and I absolutely loved, loved, loved it. Most of the blueberries are underneath the yogurt.
Smooth, creaminess passed my lips with a mild tartness with a slight hint of vanilla. I thought my yogurt days were over, but since trying the crock pot method of making yogurt, I'm now doing a happy dance with my bowl of yogurt in one hand, and a spoonful of yogurt in my mouth with the other.
I'm thinking that I could do this with any fruit and combine it to make a nice, creamy yogurty dressing for my salad, or just enjoy it as a dessert.
Either way, if you're someone who is vegan and have given up yogurt because it's dairy, this yogurt version made with soy milk is quite delightful.
A guy named Slim from a yahoo group discussion list came up with a different version of yogurt that I'd like to try sometime soon. He uses lentil milk with some other ingredients which sounds intriguing. I'll let you know when I give it a try.
Eat to live!
Laina :-)
Friday, October 23, 2009
Soy Yogurt
I' m so excited that my yogurt came out so well the first time I tried it. Don't you just love it when that happens. :-)
I read a few different websites about making your own yogurt, and the crockpot method drew me right in because I like simple and easy.
I did have a nice picture of the mixture in my crockpot, but can't seem to find it so I may have deleted it. But the picture above to the left gives you an idea of the final product and it's thickness.
But one of the website I surfed over to that encouraged the use of the slow cooker had in the comments section under the recipe that the rice milk and the soy milk didn't turn into yogurt. So because of that, I was apprehensive about trying to make soy yogurt in my crock pot because I didn't want to waste my time and money on something that wasn't going to work.
Another website suggested adding tapioca flour and agar. I bought the flour and thought I had agar at home but didn't, so I felt for sure my recipe wouldn't come out right. But I decided to try anyway because I didn't want to wait another day. :-)
Before you begin, make sure you sterilize whatever utensils you'll be using. So here's what I did.
I added two containers (32 oz) of Westsoy Organic Unsweetened Soymilk into my crockpot, and turned it on low for two and one half hours.
I was going to add the tapioca flour, but forgot to. An hour had passed before I remembered, so what I did was measure out a cup of the flour and added just enough water to mix. I took that mixture and added it to the crock pot and whisked well to incorporate it throughout the milk.
When the two and a half hours were up, I turned off the crock pot or you may want to unplug the unit to know you've turned it off, and waited for 3 hours.
After the 3 hours were up, (set a timer so you don't forget) I took out about one cup of the mixture from the crockpot and added six ounces of Silk Live Soy Yogurt. The health food store didn't have plain so unfortunately I had to use the vanilla.
This particular brand of yogurt has 6 live cultures, but............. it has added ingredients that I don't care for. There's one other store here locally I can check to see if they have a better brand of soy yogurt. I live in a small town so I'm limited to the amount of choices I have.
I put the lid back onto the crockpot and wrapped the whole thing in a very large heavy towel and let it set overnight. In the morning, about twelve hours later I checked on it and was thrilled at the results.
It was creamy smooth with a very nice texture. The yogurt had a nice tang, not overpowering. The only thing I didn't like was the faint vanilla flavor. I had hoped that the six ounce vanilla flavored yogurt wouldn't be noticed in the large batch of yogurt, but you can taste it, but it's faint. So I hope I can find some plain soy yogurt before I try this again.
The rest of the flavor tastes very much like the soy milk. I haven't added any fruit yet, but I'll be eating some yogurt by itself and probably add some thawed frozen fruit.
I have a nice Dole frozen fruit variety in the freezer. I also have a bag of frozen blueberries I may try. Or another possibility would be to use some just-fruit jams I have in the refrigerator that might taste nice with the yogurt.
I added one cup to my morning smoothie and it added a nice flavor. There was sweetness from the fruit and a little tart from the yogurt. It was a nice combination.
After setting in the refrigerator for a while the yogurt mixture thickened some. Here's a picture of it a couple of hours later.
So if you've been wanting to try your hand at making soy yogurt, I think you may want to give this a try. It really is so very easy and simple.
If you don't want to make that much at one time you can cut the recipe in half. I've read on others websites that this will last 7 to 10 days. So for me, this recipe is a bit too much since I'm the only one who will be eating it.
I'd like to try almond milk next time and see how it turns out.
All the best to you and your health.
Laina :-)
Wednesday, October 21, 2009
Laina's Vegan Chile
Tonight I decided to make my own version of a vegan chili. It came out really good except it was just a tad too spicy. The next time I make this I'll use less chili powder.
My DH doesn't follow the E2L healthy diet so I made the recipe and set some aside for him and added his ground beef to his portion.
Laina's Vegan Chile
2 small onions chopped
4 cloves garlic minced
2 bell peppers (any color) chopped
2-3 medium carrots chopped
1 large rib of celery chopped
1 pound mushroom sliced
2 cans no sodium beans (kidney, pinto, black, northern - whatever you like)
1 32 ounce can of tomato puree
1 15 ounce can of diced tomatoes
2 cups frozen corn
1 Tablespoon masa
2 teaspoons ground oregano
2 teaspoons ground cumin
1 Tablespoon crushed leaf basil
1 Tablespoon crushed leaf parsley
2 teaspoons red chili powder
1 teaspoon red wine vinegar
currants or raisins added when serving if desired
Water saute onions, and garlic for a couple of minutes. Add the peppers, celery and carrots and water saute for 3 more minutes on medium heat. Add a little water as needed for sauteing. Add mushrooms and saute for 2 more minutes.
Add the rest of the ingredients and mix thoroughly. Heat for five minutes on low and add more water if needed according to the consistency you like. To the right is a picture of the chili I use or a brand that is similar. I don't have a picture of the exact same brand, but this is the same, just a different company.
The kind you purchase in the spice isle in a jar has salt and other spices added to it. This red chili to the right is pure red chili. If you can't find it where you live and would like me to purchase and mail you some, just let me know.
Or, if you can't find this in your store you can always buy the red chili pods or even the crushed red pepper and grind away in your coffee grinder.
When I serve my chili, I lay a bed of lettuce in a bowl. I used romaine, but you can use any lettuce or spinach. If I had green cabbage in the fridge, I would have used it.
Add the chili to whatever green you chose and top it with grape or cut up tomatoes and add about one tablespoon of currants or not.
Here's a picture of what I ate tonight. Yummy!
Saturday, October 17, 2009
Granola with homemade almond milk
I thought you might enjoy watching this youtube recipe by Jennifer Cornbleet. It looks really tasty and is E2L friendly. If you try it, let me know.
Thursday, October 15, 2009
Gardening
Today I planted some spinach, lettuce and some mixed greens. I was going to plant some kale too, but ran out of time. I'll post a picture of my garden this weekend or early next week. I'm really excited because I haven't planted an autumn/winter garden before.
The picture to the left is what they looked like before they were rudely taken from their comfortable home and placed in a strange place, but at least it was a nice warm bed today.
The kale is going to be planted by seed, so you won't find them in the picture with the rest of the greens. Just wanted to save you from straining your eyes in case you tried to look for them. :-)
Today I've decided to go off of my horrible diet coke habit.........again! I went off of coke and did so well. But after giving in to one coke it led to another and another and now I'm drinking them regularly again. Ugh!
I'm going to read some websites that will tell me all the ills of drinking diet coke to remind myself of just how bad the stuff is. Usually when I read my E2L book again, it really helps too.
I've really been struggling with eating. I may get in 2 good meals and one bad. Or I may snack on something standard that's not healthy. It's probably the coke because I know it's one of my triggers that causes me to eat the wrong foods.
I'm probably doing around 85% E2L, but my goal is 100%. So I may begin the 6 week challenge again. Some of the others at an E2L discussion group are going to do the challenge, so I might join them. I don't think I have any more company coming or anything special that might interfere with committing to six weeks.
Well it's late and I need to read my emails so until next time . . . eat for health everyone!
Friday, October 9, 2009
Susan V's Creamy Zucchini and Basil Soup
Sorry I've not been keeping up with my food blog. I have been keeping up with eating nutritionally though, just swerved off-plan a little here and there.
I want to take a few minutes to brag about Susan Voisin at http://www.fatfreevegan.com/ . Many of her recipes have helped me to stay on track. I'm sure many of you would say the same thing. There were times I cried when I first began E2L. I thought I'd never enjoy food again.
I thank Susan and others like her who offer so many recipes to choose from. Some of the recipes I've tried have put a smile on my face, and have given me hope that I really can enjoy eating nutritionally and continue to enjoy cooking also.
The only criticism I could offer would be why it took so long for this particular recipe to arrive. :-) I ate half of the soup tonight. I could have eaten the whole thing, that's how good it was.
The only thing I did different was to use plain old green cabbage for some crunch instead of the zucchini Susan has spiraled atop her bowl. I think the zucchini looks prettier, but I am needing to up my intake of cruciferous veggies. I added some tomatoes for color, variety and taste. Tomatoes and basil go together like peanut butter and jelly, don't cha think? :-) I also added about 1/2 cup of unsweetened soy milk, and a little extra basil. I LOVE BASIL.
Give this recipe a try. I think you'll be glad you did. Oh, and I love the color too ......GREEN! hee hee
Creamy Zucchini and Basil Soup
2 pounds zucchini (about 5 small to medium)
1 large Vidalia onion, chopped
4 cloves garlic, crushed
1/2 teaspoon salt
1/4 teaspoon freshly ground pepper
3 cups vegetable broth (I used Imagine No-Chicken)
1/3 cup fresh basil leaves, packed
3 tablespoons raw cashews
1 tablespoon nutritional yeast
additional salt & pepper, to taste
Set aside one of the zucchini; trim and coarsely chop the rest.
Cook onion in a large saucepan for about 5 minutes, until softened. Add the garlic and cook for another minute. Stir in the chopped zucchini, salt, and pepper and cook over medium heat, stirring occasionally, for 5 minutes. Add the broth and simmer until zucchini is tender, about 15 minutes.
Pour into a blender (in 2 batches, if necessary) taking care to avoid burns by not filling the blender more than halfway. Add the basil, cashews, and nutritional yeast and blend until smooth.
Return soup to the pot, season with salt and pepper to taste, and keep warm. Shred the remaining zucchini with a spiral slicer, mandolin, or grater. Pour soup into bowls and sprinkle grated zucchini over top.
Servings: 6
Subscribe to:
Posts (Atom)